View Sensor Depthmap
🔌dp.kinect dp.kinect2 dp.kinect3 dp.oak
Learn how to view depth data (depthmap) as a monochrome image. A depthmap represents the distance to surfaces at every pixel from your sensor.
📝 This tutorial uses the
dp.kinect2plugin. Substitute the name of your own sensor plugin. For example, if you have an OAK sensor, typedp.oakinstead.
- Create a new blank patch
- Create a dp.kinect2 object in your patch with the arguments
@depthmap 1 @type float32. This instructs the dp.kinect2 object to output a depthmap and to use 32-bit floating point values in that depthmap. - You should not have any red errors in your Max console window. You can view this console window using the Windows menu on the toolbar or pressing control+m. If you have errors, please refer to those errors and the setup guide for your plugin.
- Like many objects in Max, dp.kinect2 requires you to
bangthe first inlet to output data from it. If you are not familiar with this, please visit the Max jitter tutorials online or within Max. - Create a toggle object.
- Create a qmetro object with the argument
33. This instructs the qmetro to output a bang every 33 milliseconds (1/30th of a second). Why this interval? Because, the native framerate of most sensors is 1/30th of a second. - Connect the outlet of the toggle to the inlet of the qmetro.
- Connect the output of the qmetro to the inlet of the dp.kinect2 object.
- Create a message object and make its message
open. - Connect the output of the message object to the inlet of the dp.kinect2 object. The
openmessage is needed to start/open a connection to your sensor. - Create a jit.pwindow object.
- Connect the first outlet of the dp.kinect2 to the inlet of the jit.pwindow object. There are six outlets on dp.kinect2; each for a different type of data. We will only use the first outlet in this tutorial.
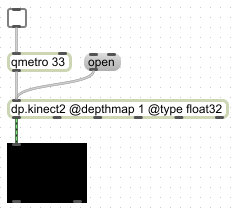
- Your patch should look similar to this picture
- Lock your patch to make it easier to interact.
- Click the open message. Click the toggle to turn it on. You should not have any red errors in your Max console window.
Congratulations! 🎉 You should now see a depthmap in the jit.pwindow.
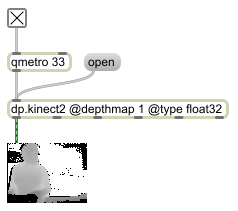
The jit.pwindow expects to receive a grey scale image matrix with values ranging from 0.0 to 1.0. We used arguments on dp.kinect2 to specify floating point values in the matrix output. Those values are distance from the sensor, in meters, for every pixel. You might see a lot of white in the image. That is because the distance of those pixels from the sensor is 1.0 meters or greater. It is likely the sensor can view a wall behind you. That wall is probably more than one meter away from the sensor. Therefore, all those pixels have values that are greater than 1.0 (meters) and are shown as white in the jit.window.
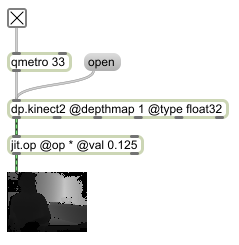
However…what if we want to more clearly view all the depth in the jit.pwindow? The answer is to scale the data. The jit.window wants values from 0.0 to 1.0. The sensor can view depth up to 8.0 meters. Therefore, we need to scale the dp.kinect2 data from 8.0 down to 1.0. We can use jit.op for this.
jit.op applies a math operation to every cell in the matrix it receives. We want it to multiply by 0.125. This is because 1.0/8.0 = 0.125.
- Unlock your patch.
- Create a jit.op object with arguments
@op * @val 0.125. - Delete the connection between the dp.kinect2 object and the jit.pwindow.
- Connect the first outlet of dp.kinect2 to the inlet of jit.op.
- Connect the outlet of jit.op to the inlet of jit.pwindow.
Well done! 🙂 You should now see a new depthmap with a wider range of grey for the distance.
When you want to learn more, please see the help file included with the plugin download. Each tab in the help file includes comments at key locations of the patch. Naturally, this documentation website is good for technical details.